 By
By The Imperial War Museum (IWM) in Lambeth, South London is one of the world’s best known military museums, and the parent to four branches of Imperial War Museums: IWM North in Manchester, IWM Duxford near Cambridge, The Churchill War Rooms in Westminster, and HMS Belfast on the Thames.
It was originally formed in 1917, a year before WW1 ended, with a mission to record the events, experiences, memories and sacrifices of civilians and soldiers from the United Kingdom and its Empire during the First World War. Of course, since then its remit has expanded somewhat.
It was opened by King George V, to the public in 1920 at its first home in the Crystal Palace, Sydenham. It moved to its permanent home in Lambeth in 1936… three years before its second major topic erupted; the Second World War.
When were those huge 15″ naval guns at the entrance, added?
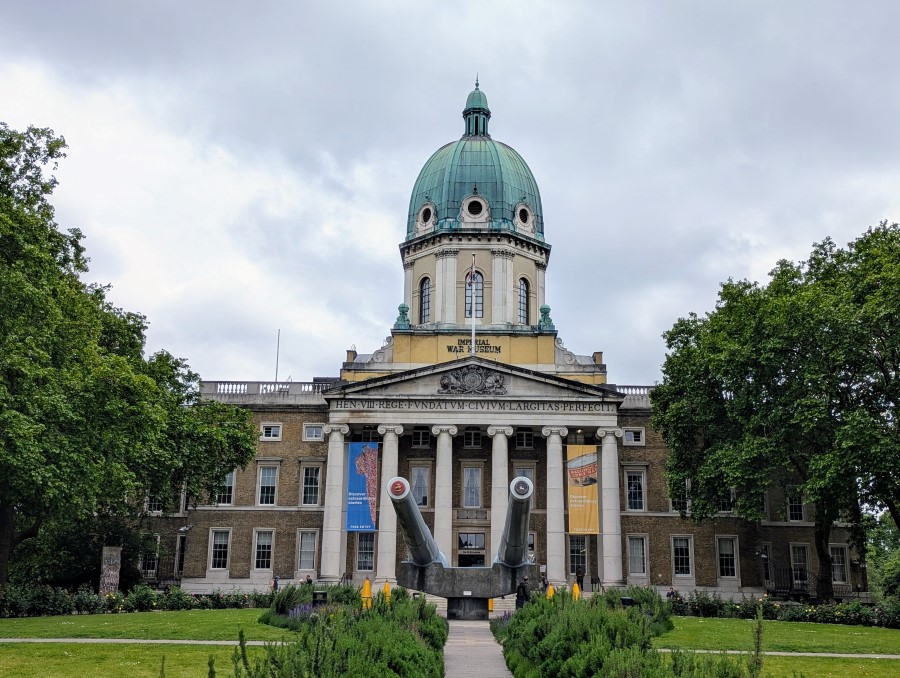
May 1968.
They are generally recognised as having come from the Royal Navy’s WW1 Revenge class battleships HMS Ramillies and HMS Resolution, both of which also served during WW2. But the HMS Resolution gun had a slightly extended history. It was later fitted in the twin turret of HMS Roberts, a WW2 monitor designed for shore bombardment. Both guns were fired in action multiple times during WW2.
My recent visit to the Imperial War Museum was my first for many years. I’ve been more recently for press launches and events, but I’ve not had a general wander around for decades.
The Imperial War Museum Atrium
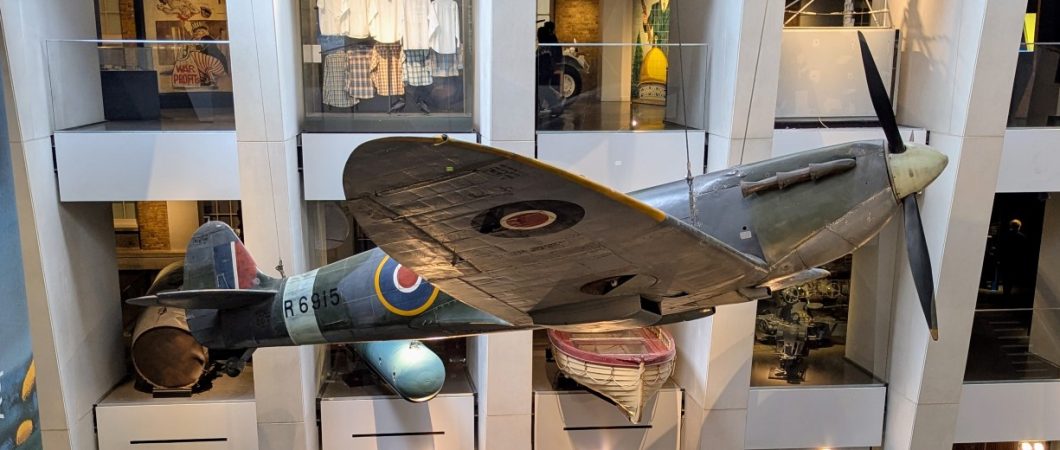
Over the years, the objects displayed in the air and on the ground have often changed, but since 1946 there has always been a Spitfire!
Originally the Mk1A Spitfire (feature image) was displayed on its undercarriage on the floor of the atrium, before being suspended.
Also in the air, are a BAE Harrier GR9, which spent a lot of its service in Afghanistan where it notched up at least 40 combat missions, and a rocket-powered Japanese Yokosuka MXY-7 Ohka Model 11 ‘Kamikaze’ aircraft, which certainly didn’t spend a lot of time in service, and really wasn’t designed to!

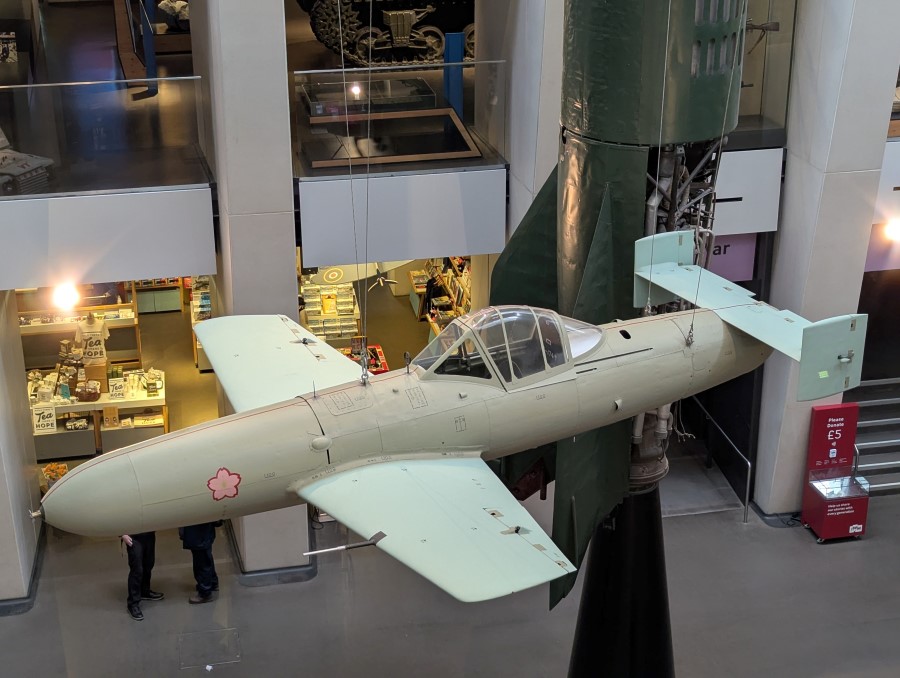
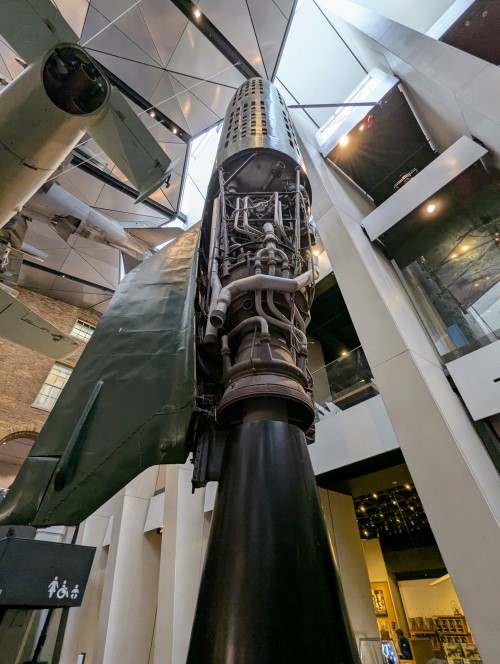
Another longstanding (and upstanding!) exhibit in the atrium is the German WW2 V2 rocket, with part cutaway so you can see the engine and fuel tanks. It has been there since 1946.
Some things in the atrium, like the Spitfire and the V2, are pretty permanent, but others come and go. There definitely used to be a V1 flying bomb suspended there at one time, and I’m pretty sure I remember a Messerschmitt bf 109 floating there, waiting to pounce on, or be pounced on by the Spitfire. For those who’ve never seen them before, these are impressive mainstream war machines… but nothing very rare or noteworthy. For those aircraft, you should head to the IWM’s collection at Duxford, or the RAF Museums in Hendon or Cosford. For a closer look at a V1 or a V2 and its engine, head for La Coupole in Pas-de-Calais.
Things change even quicker on the ground in the atrium. On my visit there were a few common items like a Russian T-34 tank (surrounded by French students! I couldn’t get near it! Not complaining. It’s really good to see them there.) and a UN Landrover. But there was one special exhibit; The Néry Gun is poignant.

It’s a British 13-pounder field gun and limber from the First World War. It was used by L Battery of the Royal Horse Artillery during a battle at Néry in northern France, on 1 September 1914. A quarter of L Battery’s troops were killed or wounded during the battle. Three of those killed were awarded the Victoria Cross.
The IWM First World War Galleries – level 0
Now these are the galleries I have little memory of from my visits years ago, so I was keen to check them out.
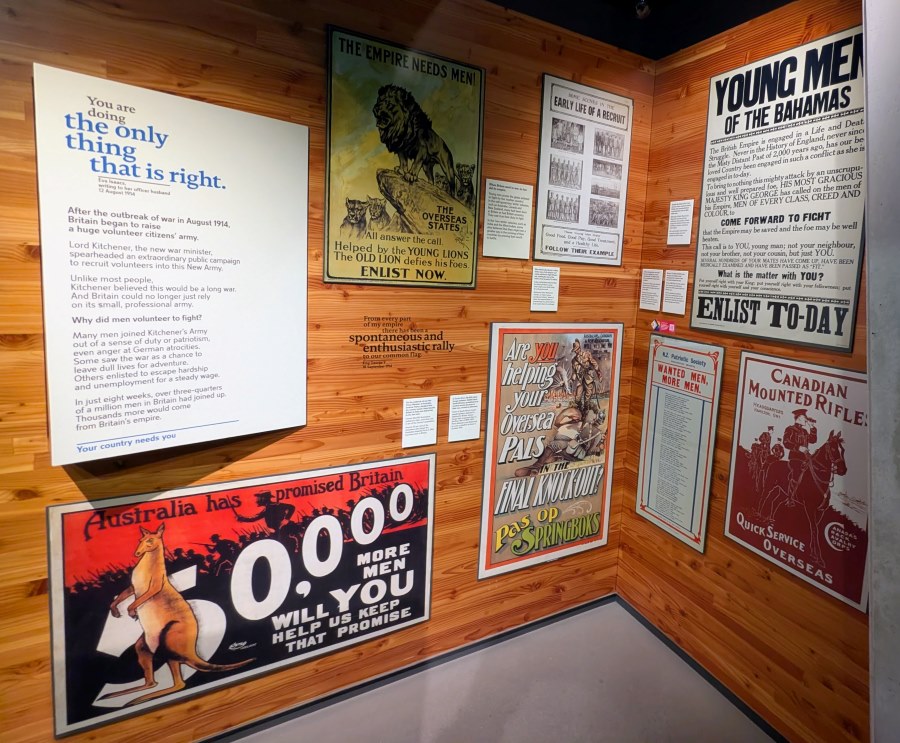
This display of recruitment posters sets the scene. It really was an Imperial war with men being drawn in from all over the British Empire.
There are some interesting exhibits of personal equipment and the machinery of war that I’ve not seen before.
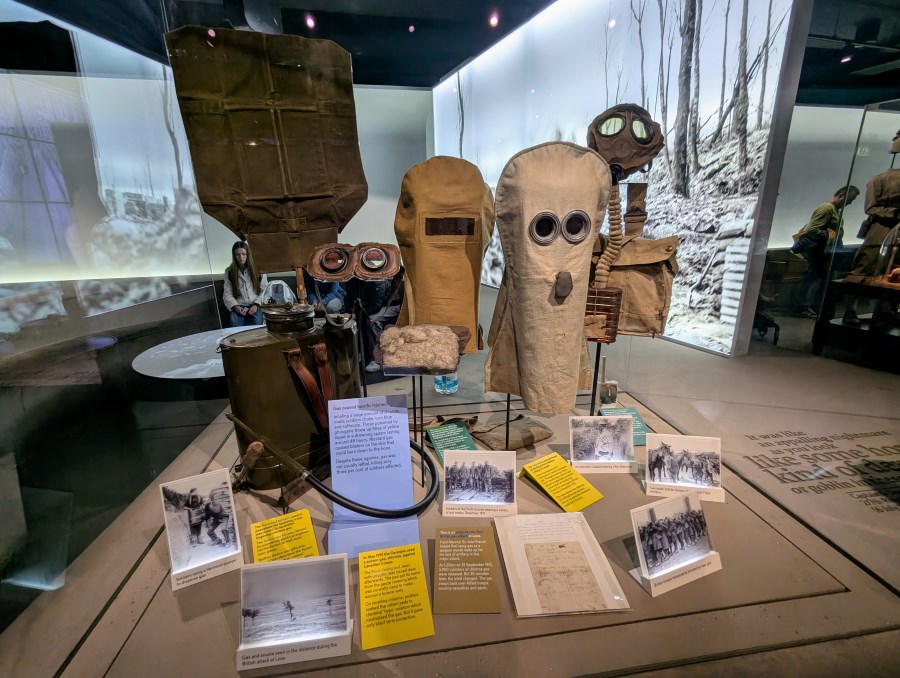
Gas was a frightening weapon. This display has gas masks, smoke masks and a sprayer can designed to neutralise gas residue.
Many WW1 museums will have examples of gas masks, but I’ve not seen these before; Allied and German rescue gear to get miners out from their tunnels when there’s a build up of carbon monoxide or other gases.

Under-mining was a major strategy in trench warfare in WW1. Teams of sappers (often professional miners recruited for the army) dug tunnels under no-man’s-land, right up to the enemy front line. Then they detonated huge piles of explosives at the appointed time; usually at the start of an assault. There are some famously huge craters, like the Lochnagar Crater, still scarring the battlefields, even today.
The trouble is, it wasn’t just the Allies digging tunnels. The Germans were at it as well. Both sides could hear each other when close, and so assault tunnellers would try to break through into the enemy tunnel. There would be furious hand-to-hand underground battles. It became a game of cat & mouse with tunnellers trying to be silent and listen out for enemy tunnellers at the same time.
I didn’t realise I had taken this photo of a French geophone with this signage, until I looked more closely at it.
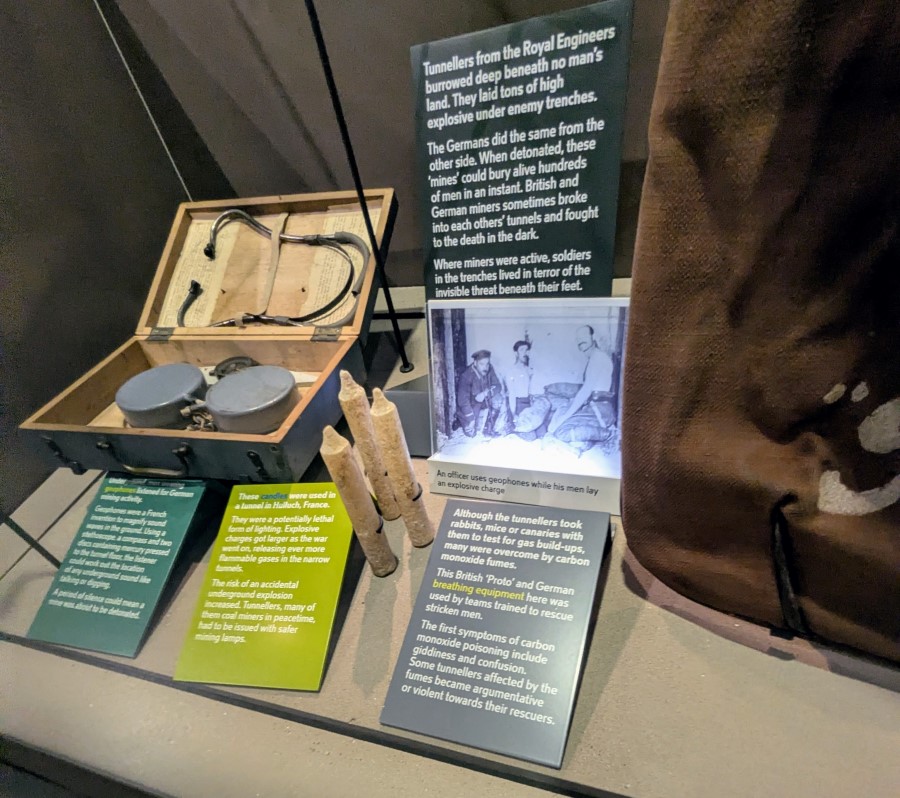
It’s an amazing ‘designed-to-solve-a-problem’ piece of engineering. You listen through the stethoscope to the sound vibrations picked up by the two grey containers which were mercury-based amplifiers. By moving the grey cans around on the floor, you could roughly determine which direction the enemy sounds were coming from.
The ‘big guns’
There are several WW1 guns in the galleries. You have to pity those on the receiving end of their munitions!
The French Canon de 75mm Mle 1897 was an admired and hated* Quick-Firing field gun. It was designed to fire anti-personnel shrapnel shells at an advancing enemy up to 8½kms away. As the first field gun to have a hydro-pneumatic recoil mechanism, it was revolutionary. Since the carriage and wheels hardly moved when fired, it didn’t need to be re-aimed between shots. So it could deliver anywhere between 15-25 rounds per minute depending on the skill of its crew.
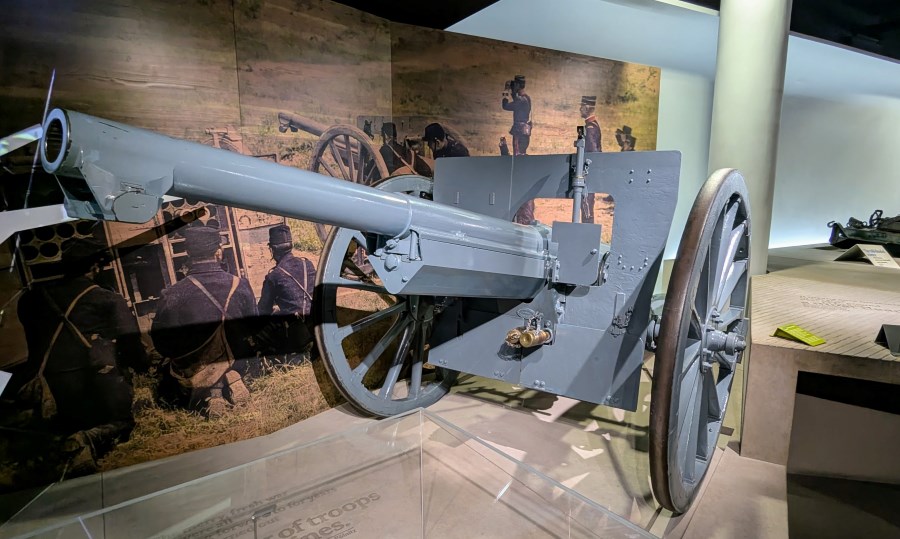
This particular ’75’ gun was used by the 61st Field Artillery Regiment on the Marne and around Ypres.
The German 27cm Minenwerfer mortar was a terrifying weapon that lobbed huge 94kg bombs into the Allied trenches.

This gun was nicknamed “Mother”. It was the first prototype of the British 9.2-inch heavy siege howitzer designed by Coventry Ordnance Works, which became a highly effective heavy artillery piece throughout WWI. How on earth they moved it about, is going to take some more research!
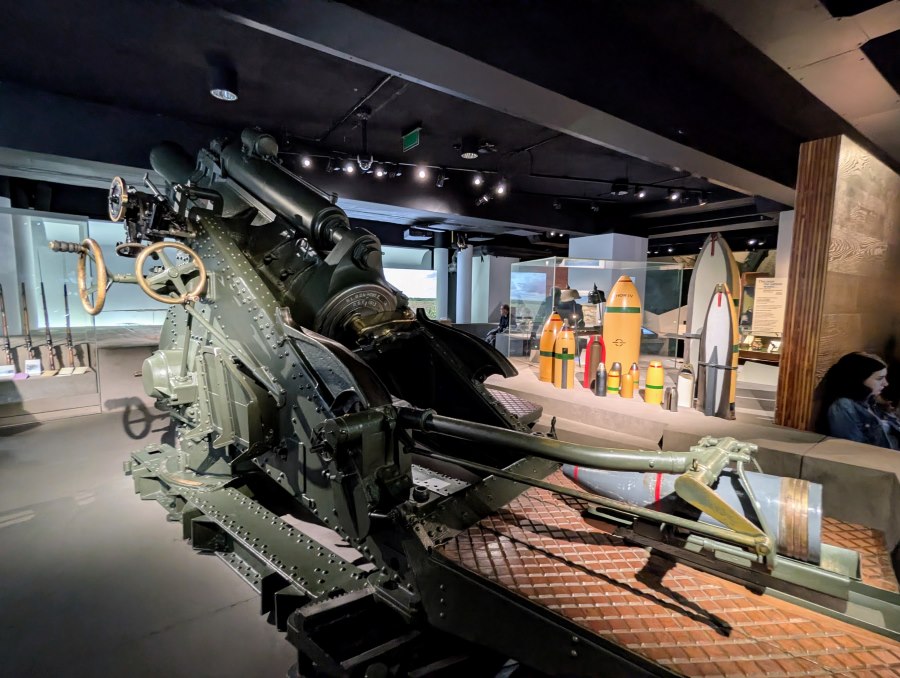
This 5.5″ British naval gun comes with a story.
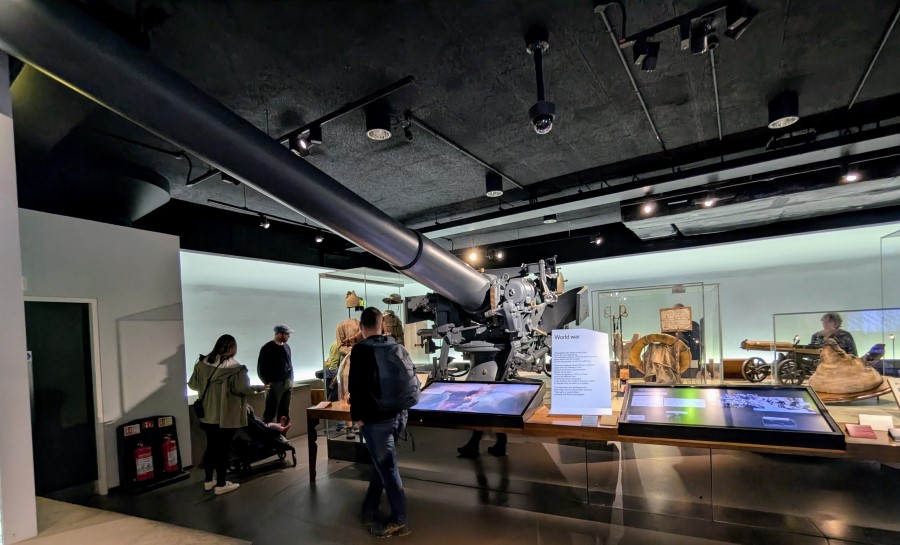
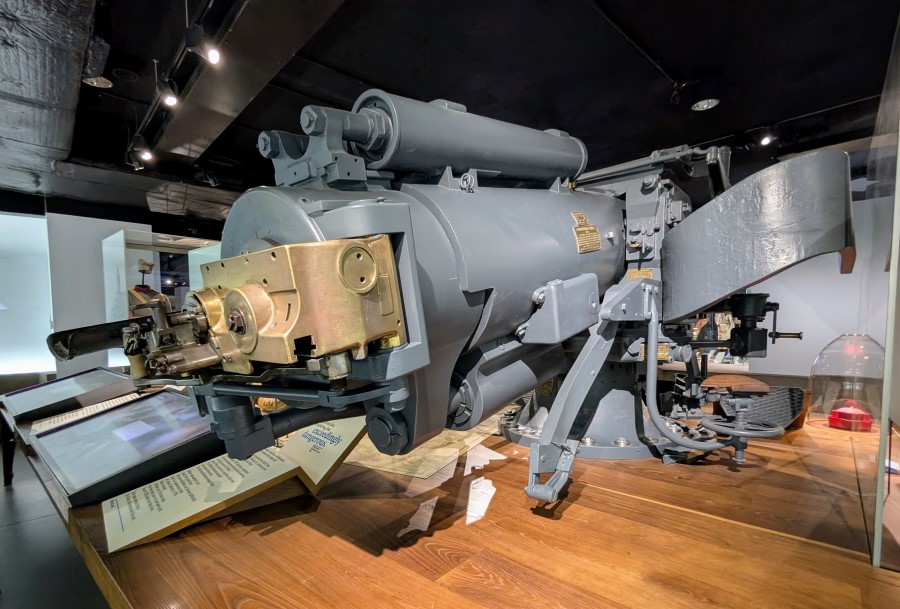
At the Battle of Jutland in May 1916, the British light cruiser HMS Chester was hit by some 17 x 150mm German shells, killing 29 sailors. The crew of this gun were all killed except 16-year-old Jack Cornwell who stayed at his post. He died of his wounds in hospital three days later and was posthumously awarded the Victoria Cross.
Many of the displays in the WW1 galleries feature uniforms and personal items.
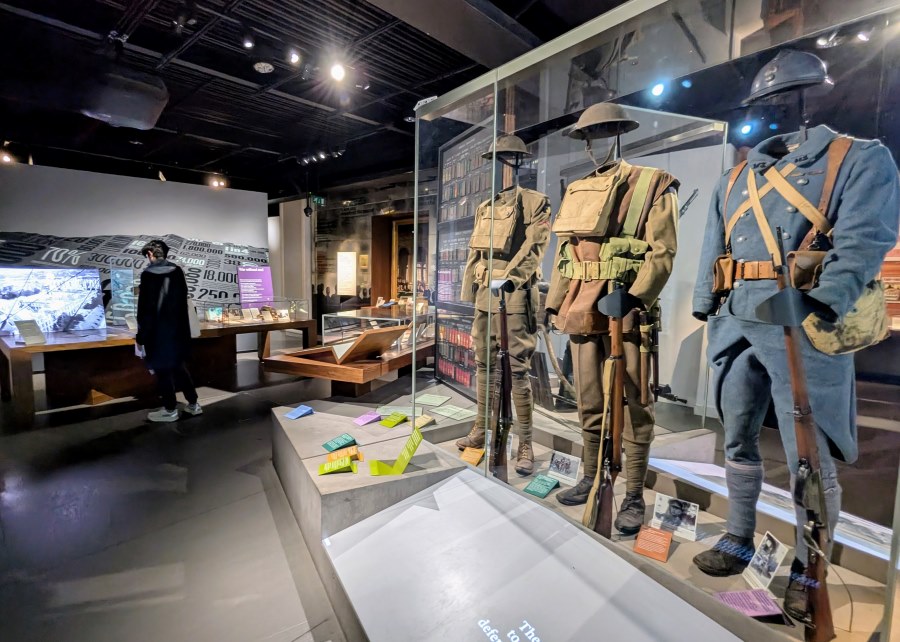
One of the more famous items is Lawrence of Arabia’s rope headdress**

… and with it, a section of track from the Ottoman Hejaz railway that he so delighted in blowing up!
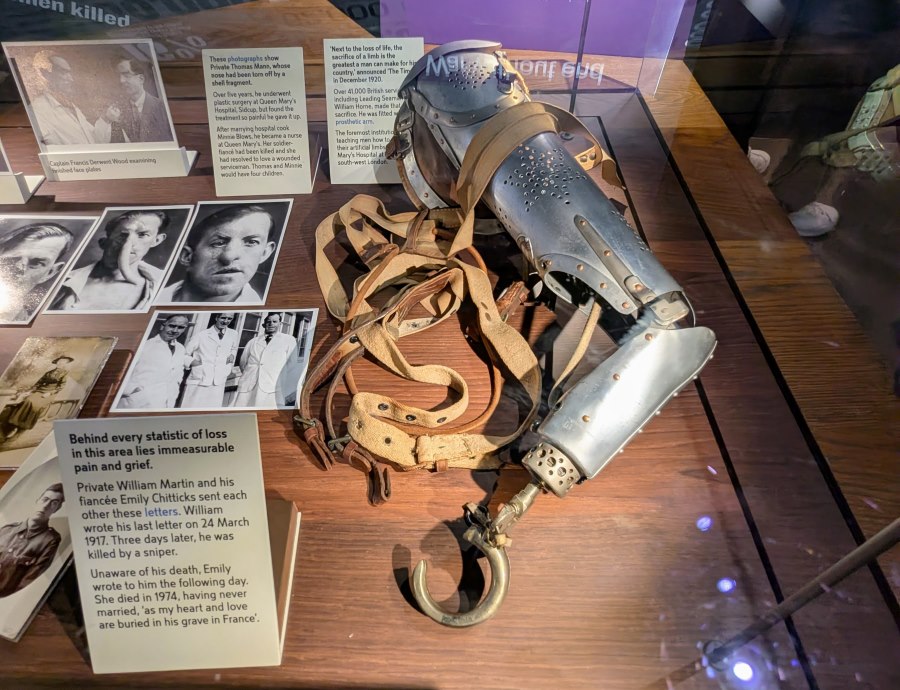
There are also many poignant displays of personal letters and photographs illustrating the crippling emotional and physical effects of death and injury sustained on a massive scale. For example 41,000 British servicemen lost limbs and in many cases needed prosthetics.
The WW1 galleries end with a short trench experience – rather safer, cleaner and drier than the real thing. Although there is a token dead rat!
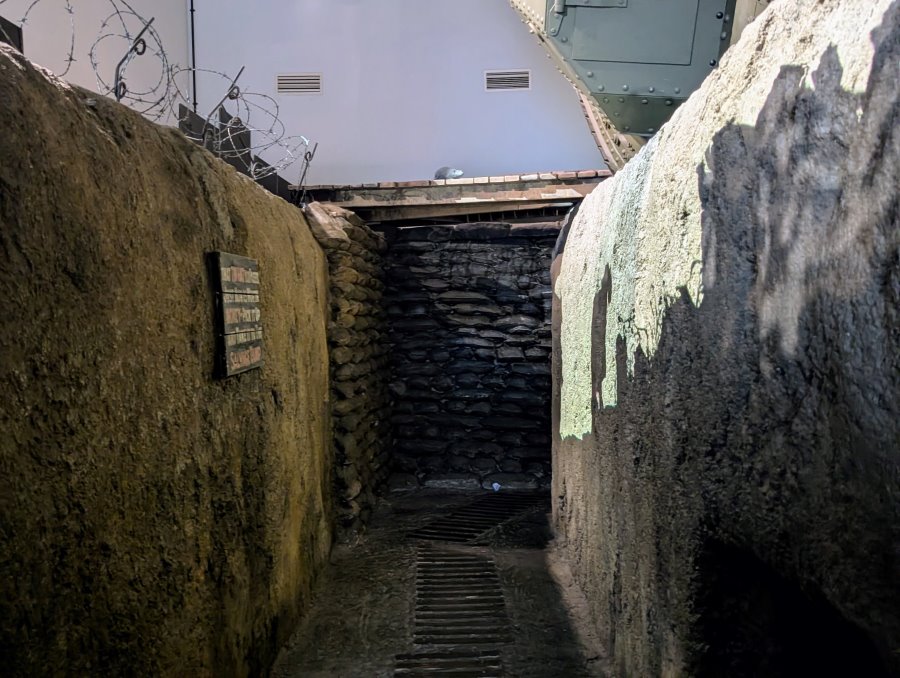
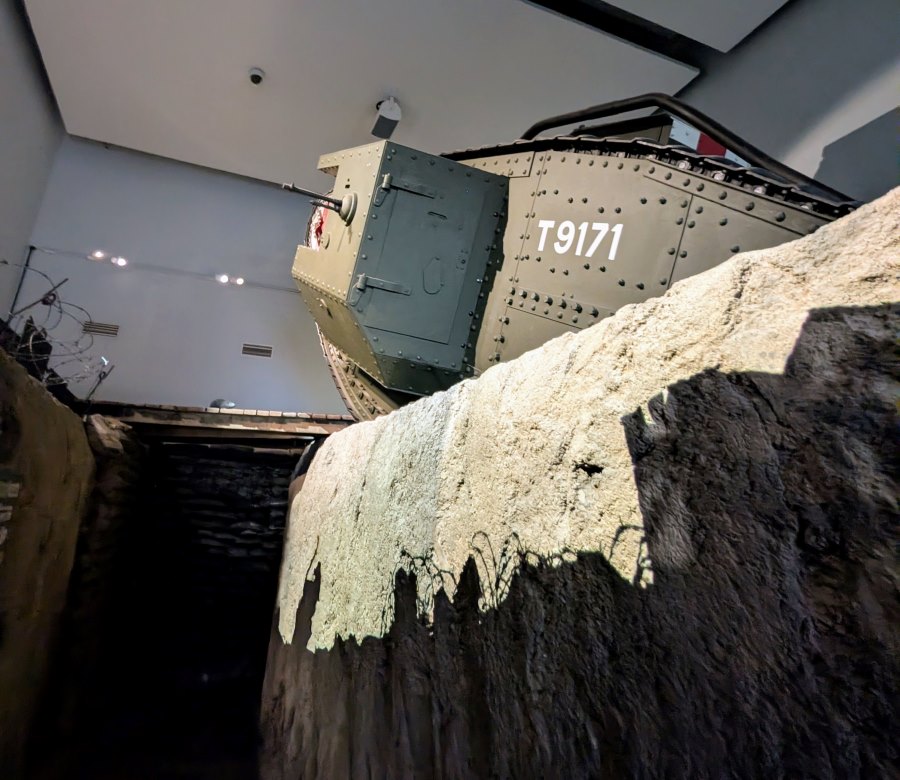
I’m pretty sure the trench has been there for many years. I’m sure I remember it from my last visit, but I don’t remember the British tank passing overhead.
The IWM Second World War Galleries – Level 1
The problem with the Imperial War Museum becomes a little more apparent on Level 1.
There’s a problem?
Well, yes… and no. The problem, and it’s not their fault, is ‘mission creep’. IWM started out with a mission to chronicle the cruel realities for soldiers and civilians of the ‘Great War’ (WW1). When they moved into this building, nobody knew there was going to be a Second World War (although in 1936 they might have guessed!). Now, the remit has expanded to cover British conflicts up to 2014. That’s one hundred years of warfare, so display space has become more precious.
The WW1 galleries have a slightly easier time of it, given that the conflict was pretty static in location and style. Yes, there’s Jutland, the Home Front, the Dardanelles & the Middle East, plus the new technologies; aircraft & tanks, but they manage to cover much of it, if fleetingly, on one floor.
WW2 was truly global and a war of movement; The Atlantic War, Dunkirk, The Battle of Britain, The North Africa Campaign, The Norwegian campaign, The war with the Japanese in Burma and the Far East, The war with the Italians in the Mediterranean, Sicily and mainland Italy, The bomber campaigns over Germany, D-Day, Arnhem, crossing the Rhine, to mention just a few topics. It’s a HUGE subject, impossible to cover on one or even more floors. So, the museum doesn’t try. It simply uses a few artefacts, displays and random objects to intrigue and inform.
And, the IWM does have a few cards up its sleeve.
In common with most museums, its collection is an iceberg. What you see on display – above the surface – is just a small fraction of what’s hidden away in storage. So the items on display can be changed fairly regularly to keep galleries fresh.
And, if you are particularly interested in war leadership, the war in the air, or naval warfare, you can always visit one of its branches.
So, what is in the WW2 galleries?
Well, starting with what they call the ‘Terrace Galleries’ that surround the atrium, I found plenty of ‘ordinary’ objects (show me a WW2 museum that doesn’t have a Sherman tank, a Merlin engine, a Norden bombsight, or an Enigma machine!) but also a few cool things I hadn’t seen before.
…like the Smith Gun. A wheeled 3″ anti-tank weapon, used by the Army, Home Guard and RAF Regiment from 1941. Its unique feature was that it could be wheeled into place and then tipped onto one of its wheels to be fired.
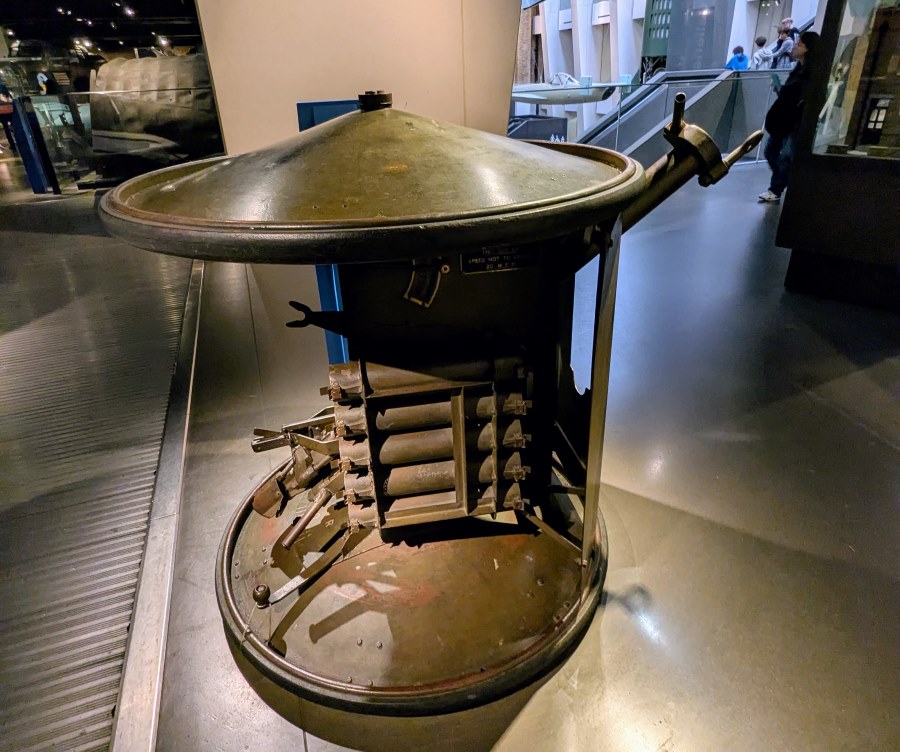

Sadly it was not deemed to be very effective beyond a few hundred yards. I suspect its short barrel didn’t give the mortar-style shells much velocity.
A torpedo is a torpedo, is a torpedo.
They all look roughly the same, but I’m not sure I’ve seen the G7e(TIII) before. This was the German U-boats’ standard electric torpedo from mid 1942 on, and it’s quite impressive at 7.16 m (23½ ft) long, carrying a 300 kg warhead triggered by a proximity fuse which would detonate under the keel of a ship, breaking its back.
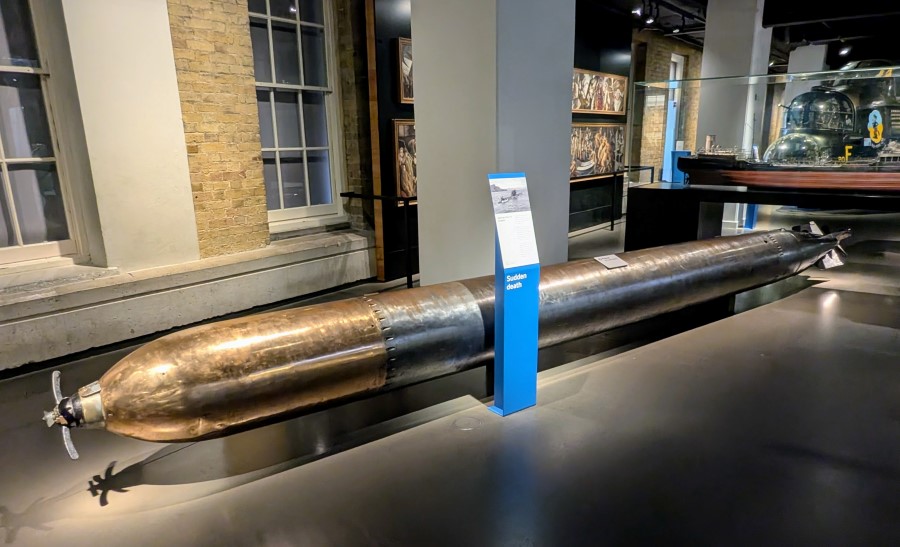
Later, the The FaT (Flächen-Absuch-Torpedo) variant had an extra trick. After a preset distance, by which you could assume you had missed your target, it switched to a circular or zig-zag course to increase the chance of hitting something else in the convoy. Sneaky huh?!
Now here’s something I knew about but I’ve never seen one before.
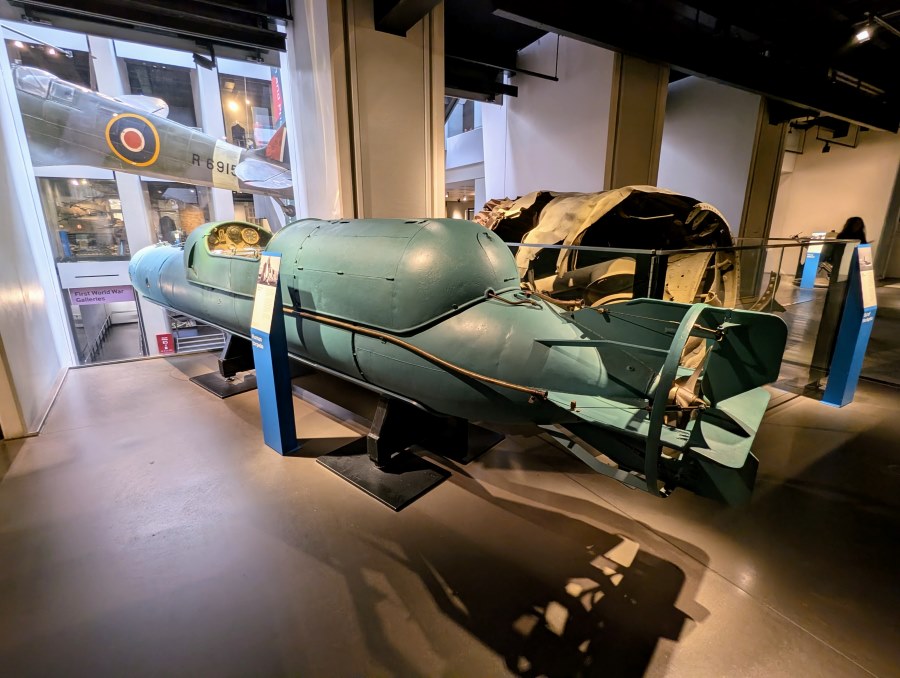
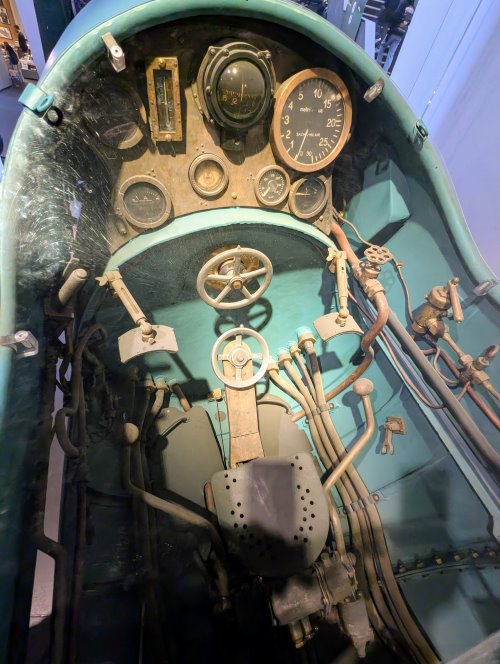
An Italian two-man SSB ( Siluro San Bartolomeo,”San Bartolomeo Torpedo” ) better known as ‘Pigs’ (“Maiale”) to their crews, thanks to their underwater handling characteristics.
They were designed to sneak past nets and get into enemy ports where the divers could unlock the nose warhead – a mine, with a timer – and attach it to the hull of an enemy ship, before slipping quietly away.
Looking into the front cockpit is interesting. Controls for steering and buoyancy, but what I found fascinating is the leg restraints; two pads to keep downward pressure on the diver’s thighs so he doesn’t float up! I hadn’t thought of that as an issue.
Two familiar items…
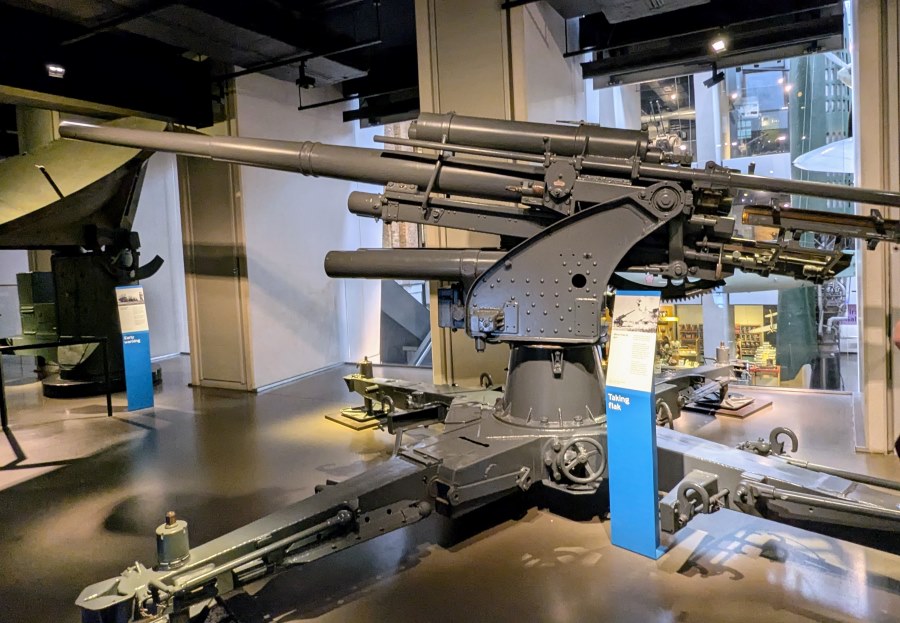
There’s a German 88mm gun in good condition. This high-velocity gun was lethal as an Anti-Aircraft gun (what it was designed for) but also as an Anti-Tank gun. However, as museum exhibits they are hardly rare.
And an old friend.
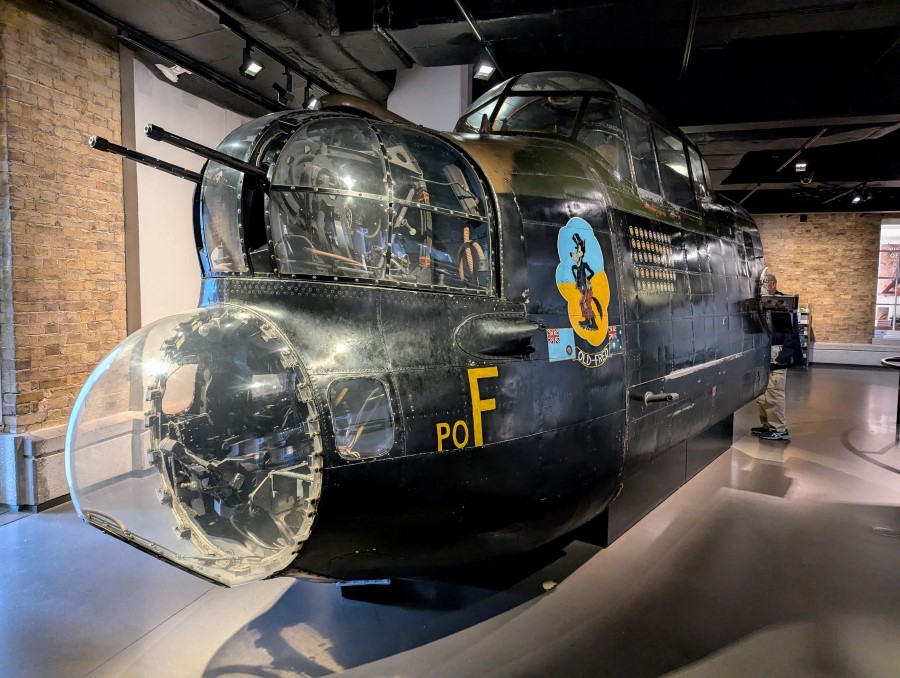
I remember the Mk 1 Lancaster bomber nose section from years ago. It’s nice to see it is still here. However, I got talking with an Eastern European visitor who was mightily confused by it. Without wings it looked to him at first glance like an airship gondola or possibly a marine craft! I can’t blame him. Out of context like that, it could confuse anyone.
This object brought me up short. It’s a German Würzburg A radar.
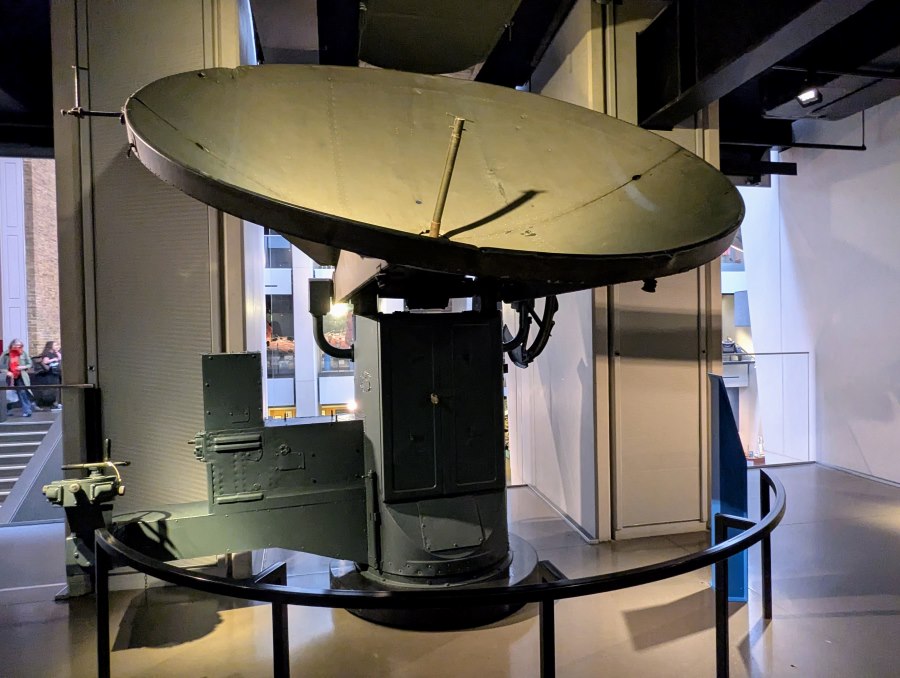
Now, I’m very familiar with the Würzburg. At least I thought I was. There’s a Würzburg-Reise radar unit at the Radar Museum at Douvres-la-Deliverande in Normandy and there’s another at the Luftwaffe Museum in Gatow, Germany. They are quite big. Their parabolic dish is 7½ metres in diameter (approx. 24.6 feet). I didn’t know that the earlier Würzburg A variant (and B, C, & D) was much smaller – 3 metres (approx. 10 feet).
And it turns out that the target of the famous Bruneval Raid (Operation Biting) on the night of February 27–28, 1942, was a Würzburg A model. I’d always thought it was a Reise – hard to tell the scale from the aerial photos. My bad!
Heading back around the other side of the WW2 Level 1 galleries…
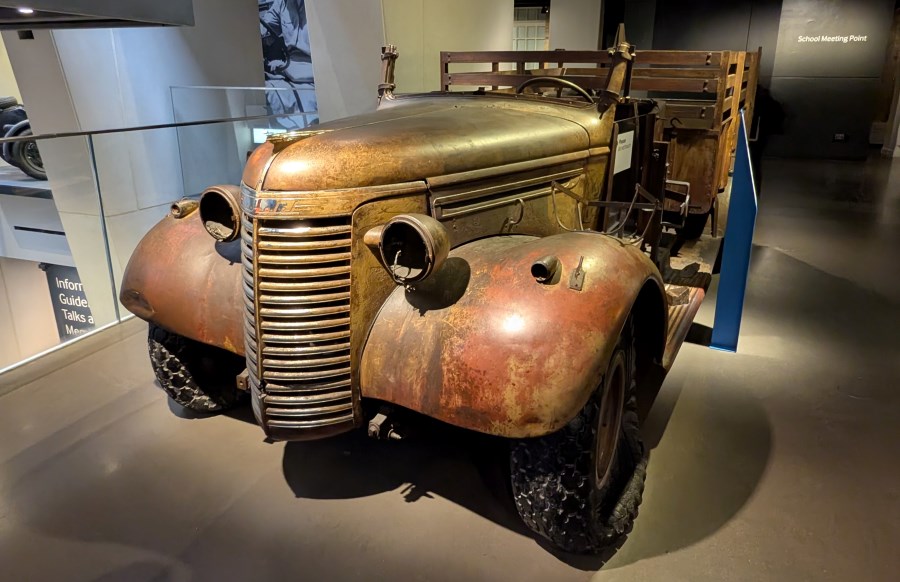
Instantly recognisable, there’s the wreck of a Long Range Desert Group (LRDG) truck. This one got left in the Egyptian desert and was only rediscovered in 1980. As a result it has a lovely bronzed patina!
And also instantly recognisable, despite its condition, is the wreck of a Japanese Mitsubishi A6M ‘Zero’ that had crashed in the jungle on the Pacific island of Taroa.
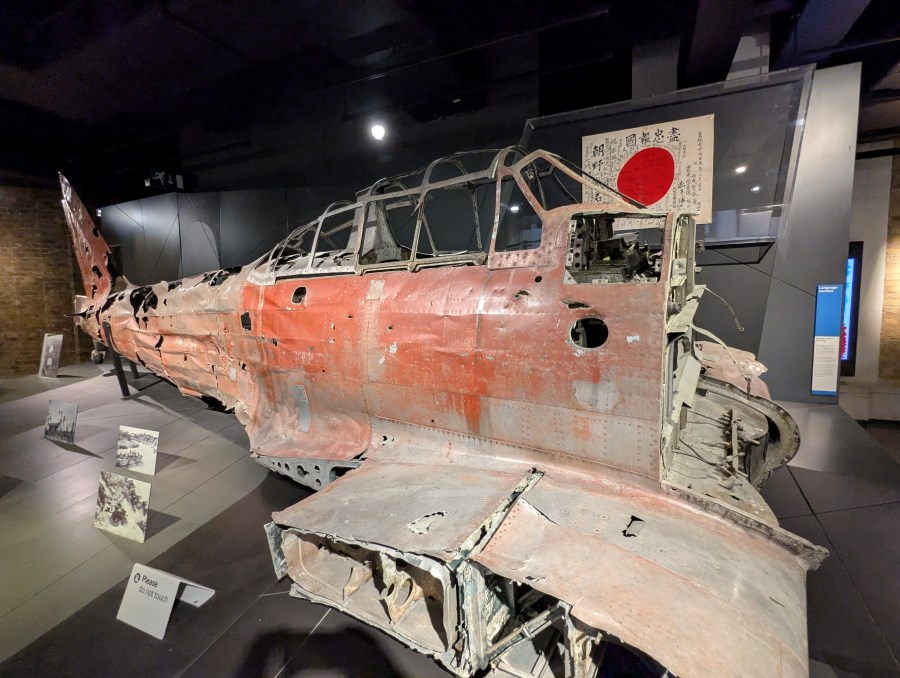
The trouble is, the Japanese war machine was so comprehensively destroyed by the end of the war, there were very few intact examples of aircraft (or vehicles & ships) that survived. The IWM has the cockpit of another Zero stored somewhere, presumably Duxford, but that’s all there is in the UK. There are around ten Zeros in various conditions in museums around the USA, and the same in Japan, but then the numbers get thin, with only one in new Zealand and one in Indonesia. If you want to see the real thing, in an airworthy condition, with its original Sakae engine, you’ll have to go to the Planes of Fame museum in Chino, California.
There are more vehicles and artefacts, well two at least, that I’ve not seen before on this (east) side of the ‘terrace’ (‘atrium’) galleries.
Starting with Gen. Montgomery’s Humber Super Snipe staff car.
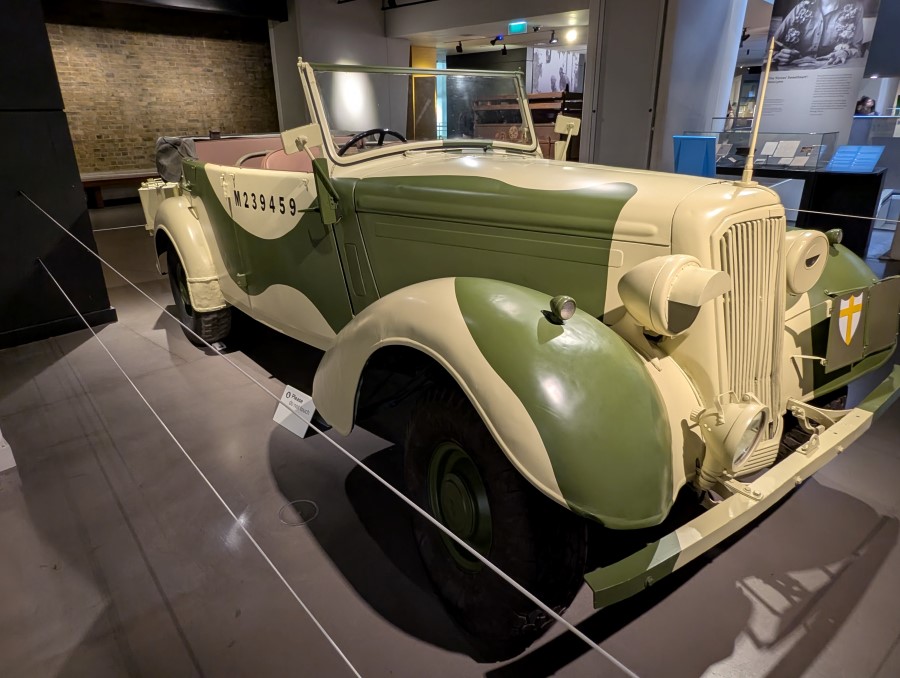
He used this car during his North Africa, Sicily, and mainland Italy campaigns, but when he was recalled to the UK to begin planning the invasion of Europe, the car stayed behind to be used by successive 8th Army commanders.
I remember seeing Monty’s Map Caravan in the old Land Warfare Museum at Duxford a decade ago, and I believe the IWM have his Bedroom Caravan in their collection somewhere.
I’m sure it’s been thought of or done before, but a ‘Monty encampment’ with all his vehicles in one tableau would be fun!
And this was completely unknown to me – The American Clarkair CA-1 bulldozer.
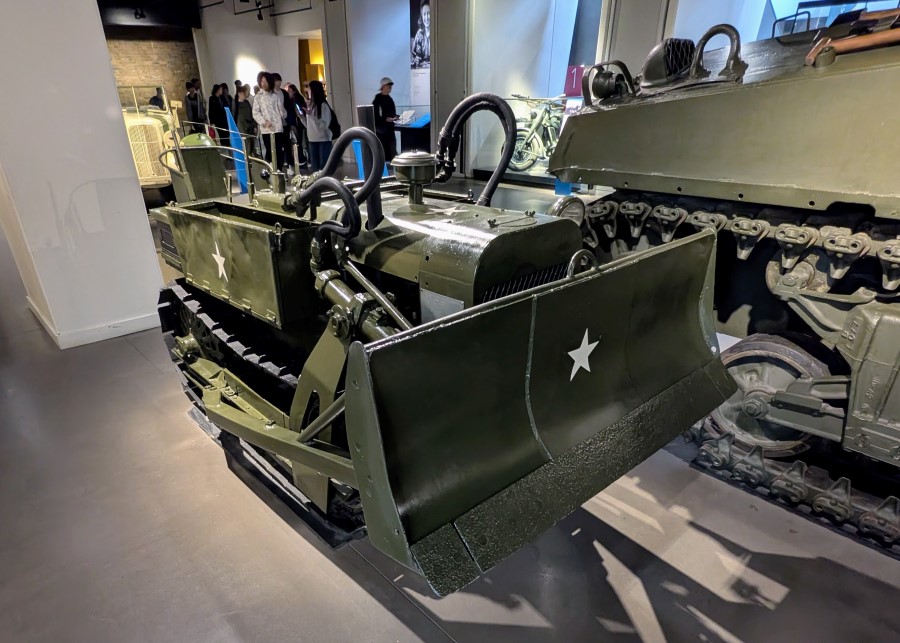
We’re all familiar with the American D-4 Caterpillar bulldozer with its gantry system for raising the blade (seen everywhere and very busy in Normandy)… well, this is tiny by comparison. There’s a reason for that. It was designed for airborne deployment; in gliders or transport aircraft. I’m going to look into the service history of these miniature bulldozers, more seriously.
The main Second World War gallery on Level 1 houses some of the smaller items, such as uniforms, small arms, personal items and the stories that go behind them.

The largest items in here are two towed artillery pieces: a British 25-pounder field gun from the North Africa campaign and a German Nebelwerfer rocket launcher.
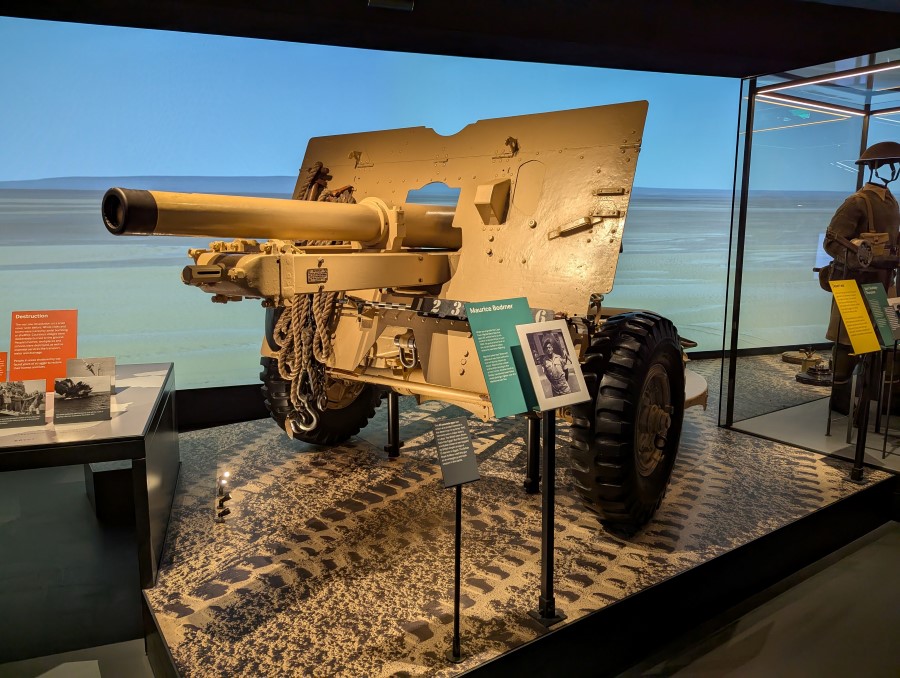
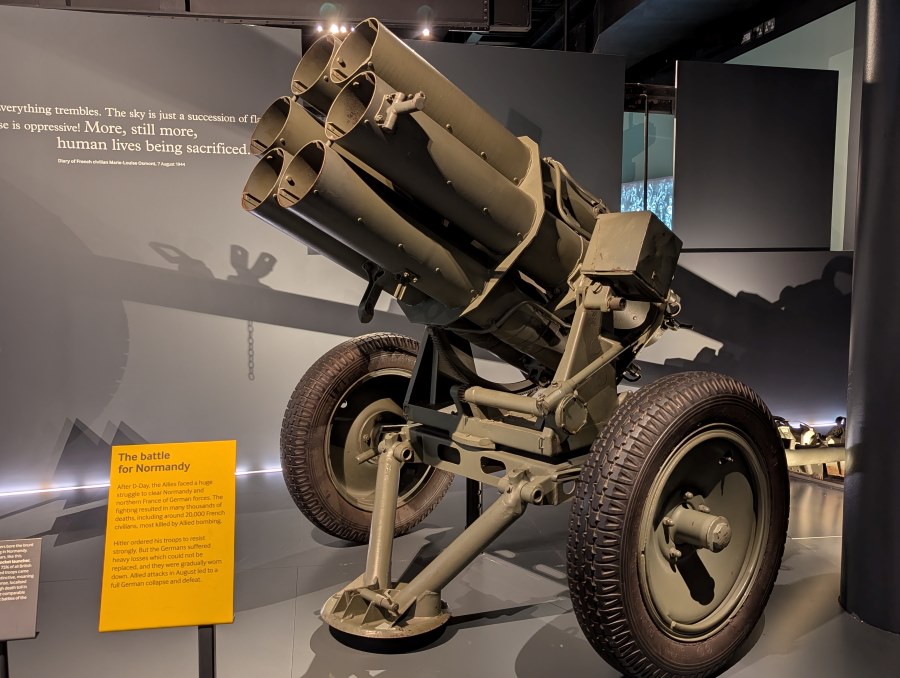
I knew the Nebelwerfer was much hated and feared by Allied soldiers, but I didn’t know that, according to the IWM signage, the Nebelwerfer alone accounted for 75% of all British casualties in the Battle of Normandy!
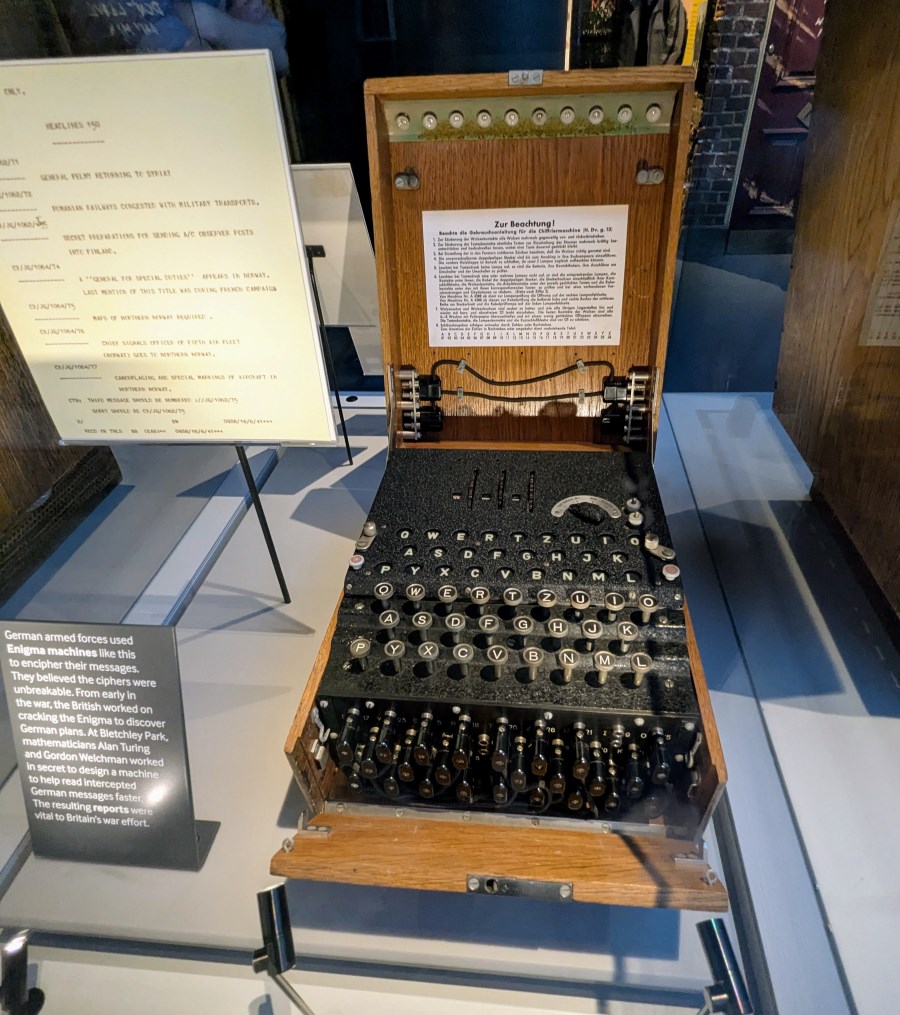
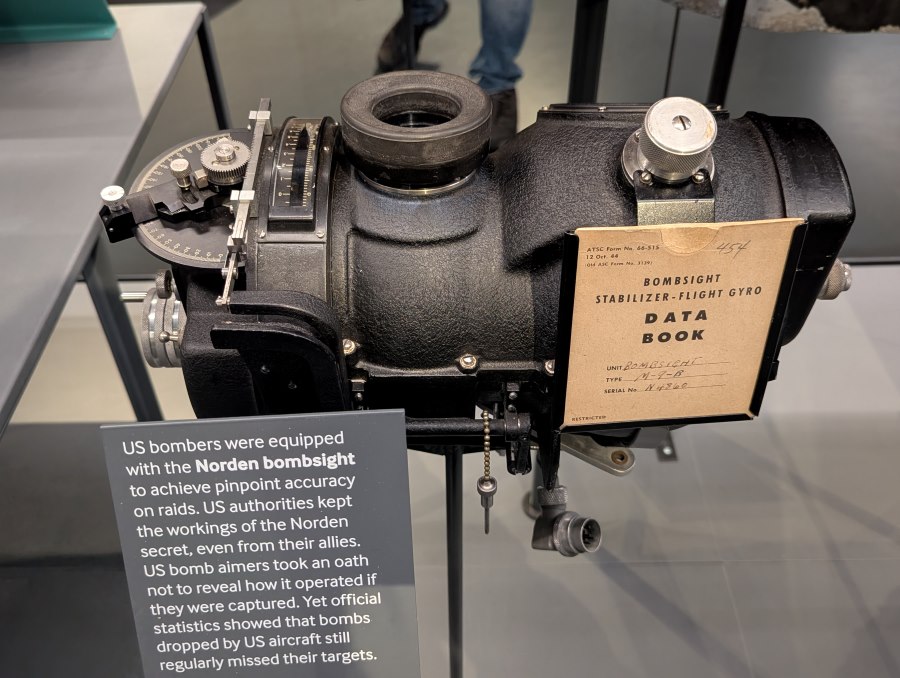
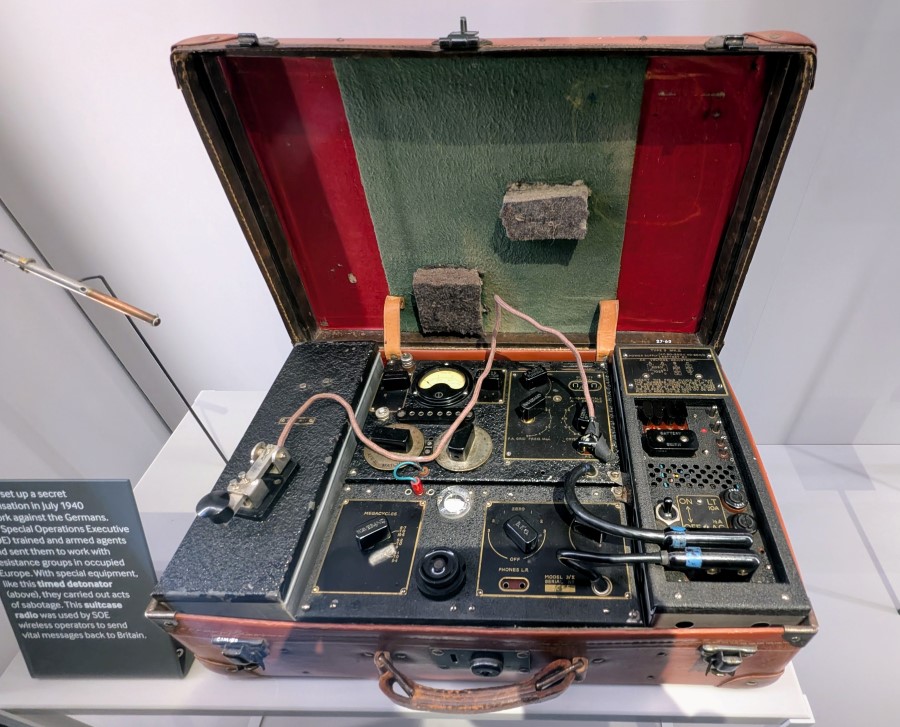
It has always seemed to me ironic that some of the most top secret items during WW2 are now among the most common items in museums. As I said earlier, show me a WW2 museum that doesn’t have an Enigma coding machine, an SOE suitcase transmitter or a Norden bombsight! The IWM has the full set in this gallery.
I did find myself getting interested in mines. I’ve not seen this type of time-delayed magnetic limpet mine, used by British Commandos on naval targets, eg merchant ships in harbour. TBH it looks a bit clumsy to me. I wouldn’t like to try and silently attach that to the hull of a ship at night!

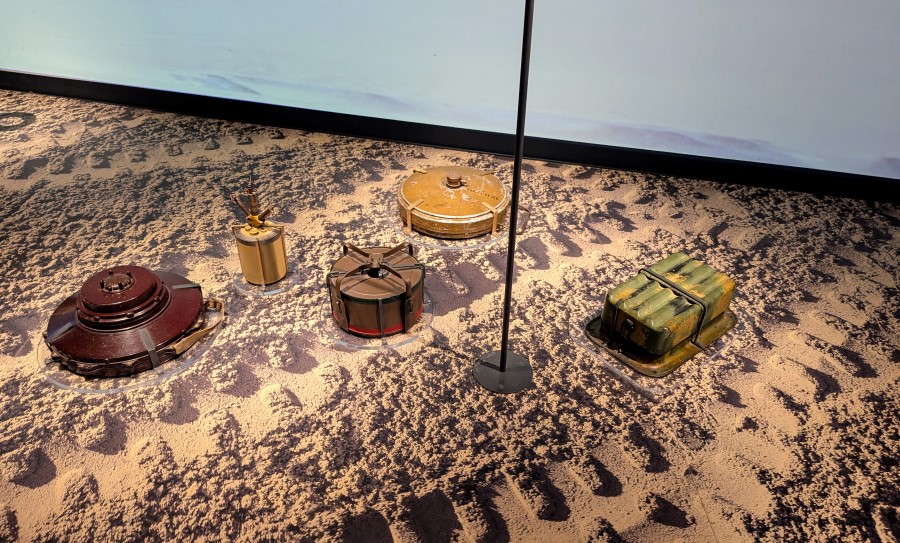
And there is a good display of Axis mine types used in the North African desert. Half a million mines were laid by German and Italian troops in front of their positions at El Alamein. Finding a way through was a nightmare for the advancing Allies.
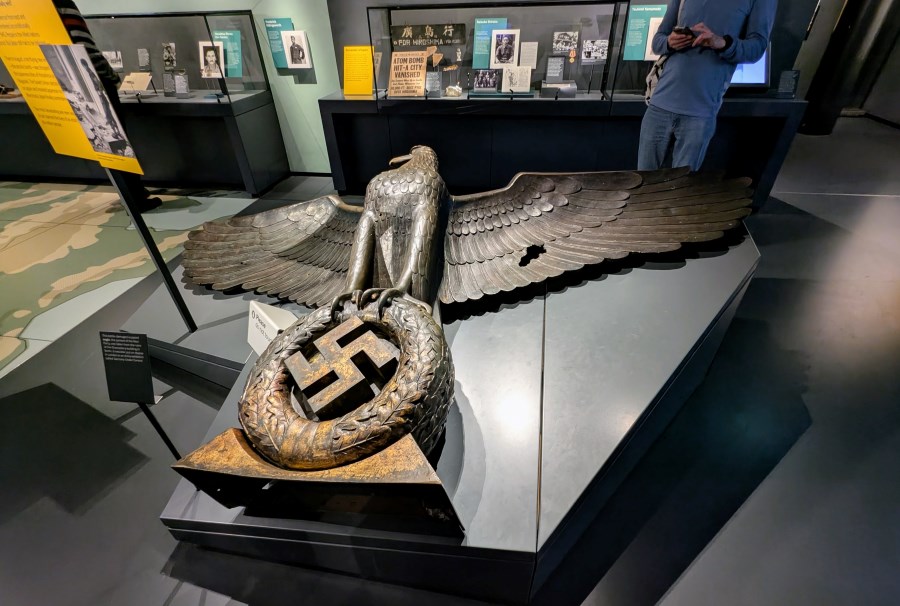
Perhaps one of the most surprising artefacts in this gallery, is the rather disfigured, but still impressive, Nazi eagle sculpture pulled down from the Reich’s chancellery in Berlin at the end of the war in Europe.
The ‘IWM Peace and Security: 1945–2014’ and ‘Holocaust’ Galleries – Level 2
Level 2 at the Imperial War Museum comprises two galleries: the ‘Terrace Galleries’ that surround the atrium, and then the Holocaust galleries which occupy the rest of the space.
The ‘Terrace Galleries’ cover (thinly, there isn’t much space!) the decades between the end of the 2nd World War and 2014, the year that marked the rise of ISIS and the Russian annexation of the Crimea. It starts with one of my favourite objects!
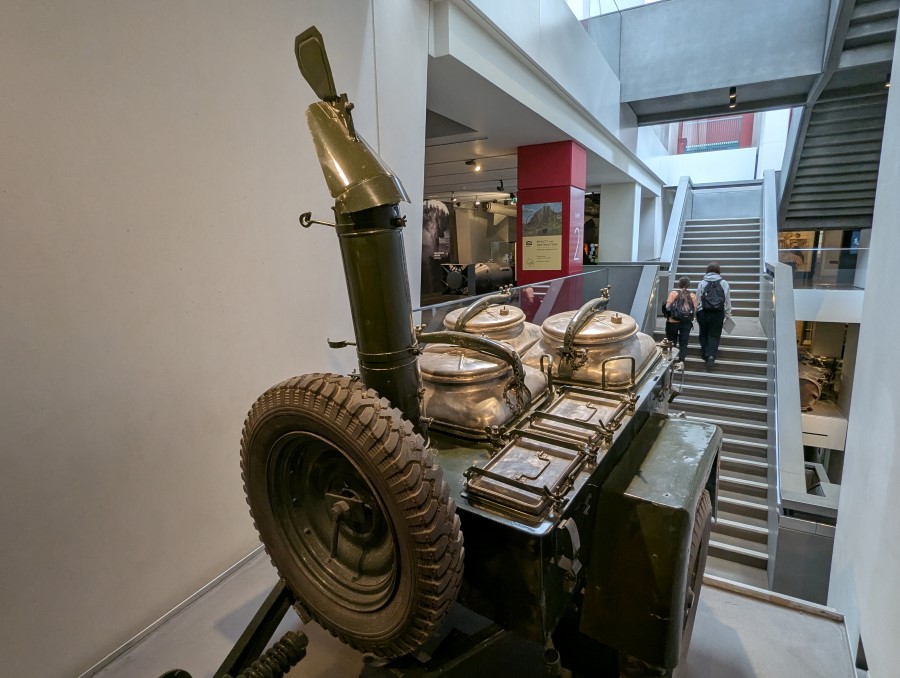

I may be weird, but I’ve always had a fascination for mobile field kitchens. I’m not sure what it is, but they seem such a fundamental piece of military kit; just as important as the main battle tank! What did Napoleon say? “An army marches on its stomach”? Well the field kitchen is all about soldiers’ health and morale.
So I was really pleased to see this former Czechoslovakian field kitchen on the 2nd floor. It was apparently captured from Egyptian forces during the 1956 ‘Suez Crisis’, by 9 Parachute Squadron Royal Engineers.
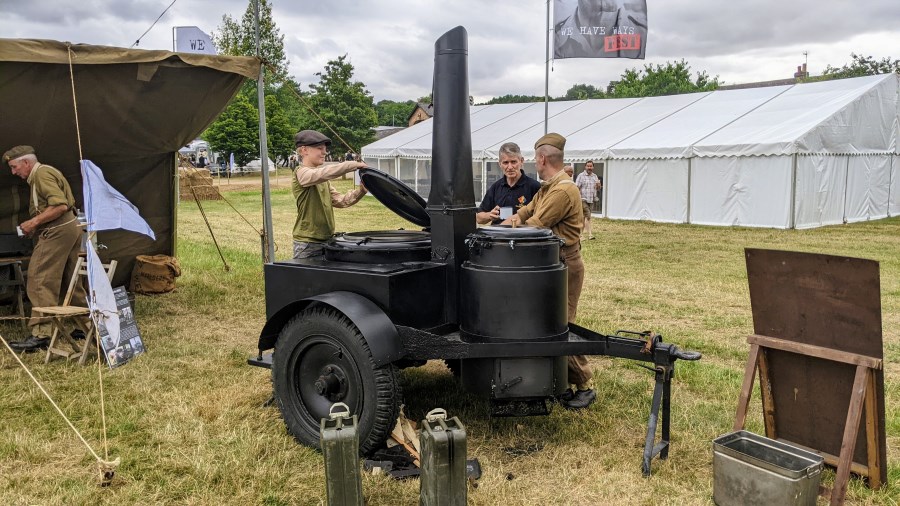
Another example: these guys deploy at re-enactments, history and military festivals with this Belgian field kitchen and serve the tastiest Spag Bol!
I know the French National Tank Museum have a 1932 German Kleine Feldkuche (Hf 13). German troops nicknamed them ‘Gulaschkanone’. They obviously recognised their importance; as in: “never mind how many cannon you have for this battle, how many Goulash cannons have you got?!” (Actually, they were given the name because the smokestack resembled a cannon barrel.)
Want to know more? Want to know how to cook on them? What to cook? And for how many? Well there’s a fascinating coffee-table style book called ‘Gulaschkanone’ by Scott L. Thompson with loads of B/W and colour photos of German field kitchens in action and restored field kitchens operated by modern day re-enactors.
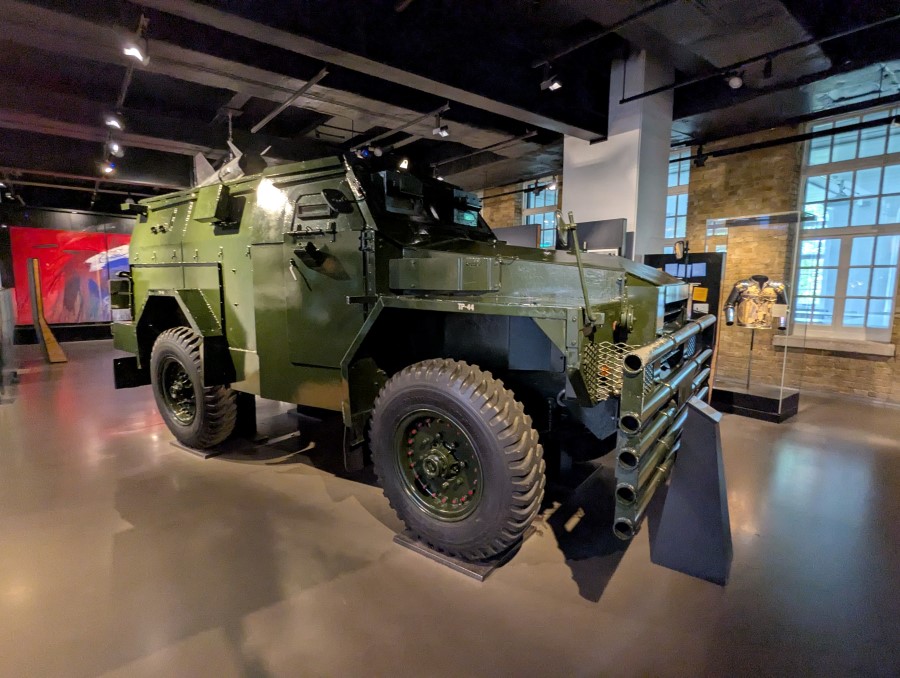
This is a reminder of the dark days of ‘The Troubles’ in Northern Ireland. A FV1611A Humber Pig armoured personnel carrier (6 troops, 2 crew). It was primarily used by the British Army and Royal Ulster Constabulary for riot control.
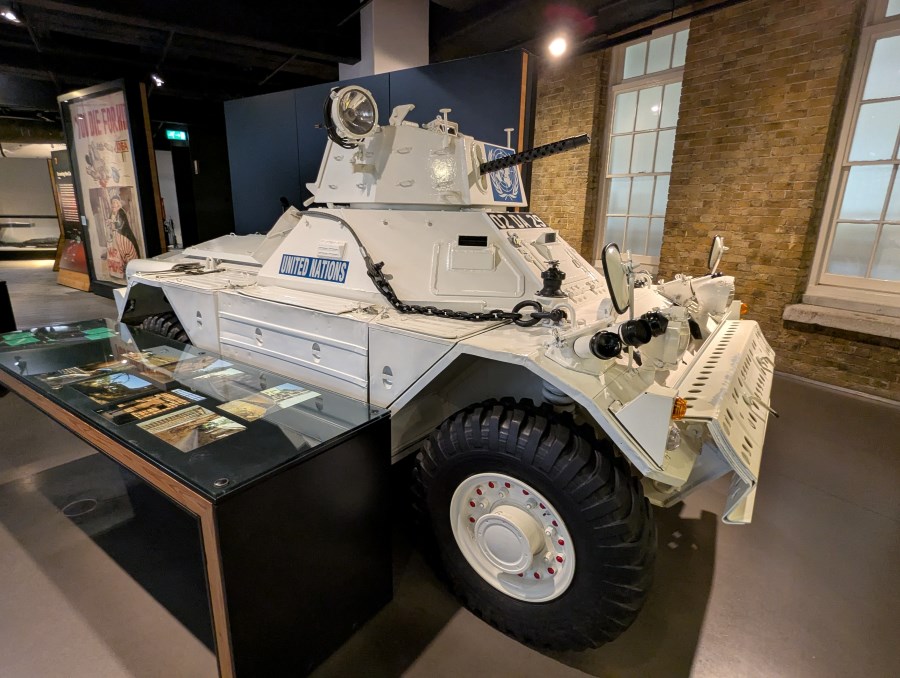
And another armoured car. This is a Ferret MkII Scout Car in United Nations livery. It served in Cyprus between 1979 and 1984.
In one corner of the terrace galleries there is a section devoted to the nuclear standoff in the Cold War. It features several missiles and early warning test and detection equipment. Chillingly, one of the largest missiles suspended from the ceiling is actually a small scale test version of Blue Steel which was Britain’s last independent airborne nuclear deterrent. The real thing was a monster carried by the RAF’s fleet of V bombers. Notice how it doesn’t have an upper fin? It was too big to fit in a normal bomb bay so it was suspended underneath.
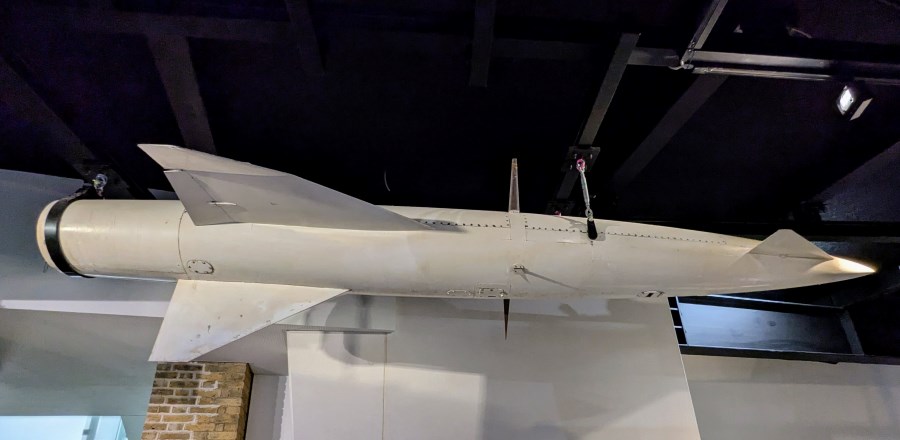
Launched from a bomber some distance from the target, it was designed to fly as a pilotless aircraft. But it was unreliable (not a good characteristic for a nuclear weapon!), and had too short a range. So the military were already looking for an alternative even before Blue Steel finally entered service in 1963. That alternative was the submarine-launched Polaris missile.
Nearby is the WE 177 tactical nuclear bomb in service with the Royal Navy and Royal Air Force between 1966 – 1998.
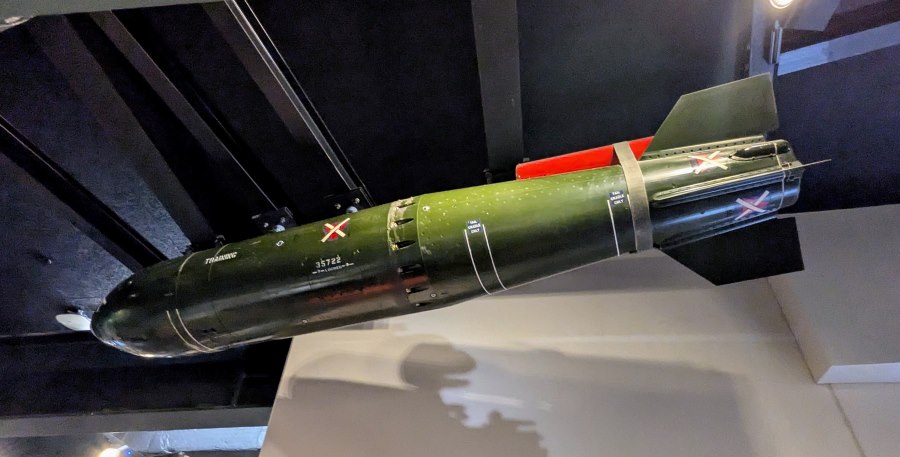
These were designed to be delivered by aircraft and had differing yields between 200 – 450 kilotons. This particular (inert!) example is a Royal Navy WE.177A: anti-submarine bomb carried by RN aircraft (10 kilotons) or helicopters (0.5 kilotons).
There’s also the amazingly complex Penetration Aid Carrier (PAC) for a Polaris missile.
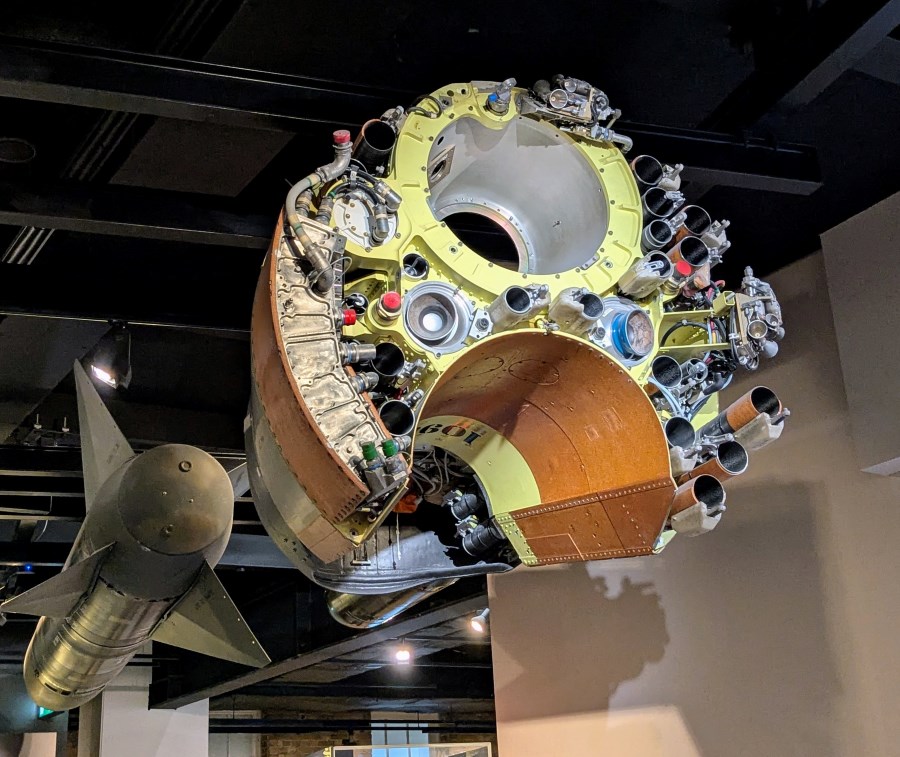
This thing, at the nose of the missile, carried the warhead in that recess. On re-entry into the atmosphere, it released the bomb and then, in its trail, a flurry of different decoy missiles and chaff designed to confuse Russian defences with multiple moving targets. There’s another PAC on display at the Royal Navy Submarines museum in Gosport (with rather better signage explaining how it worked).
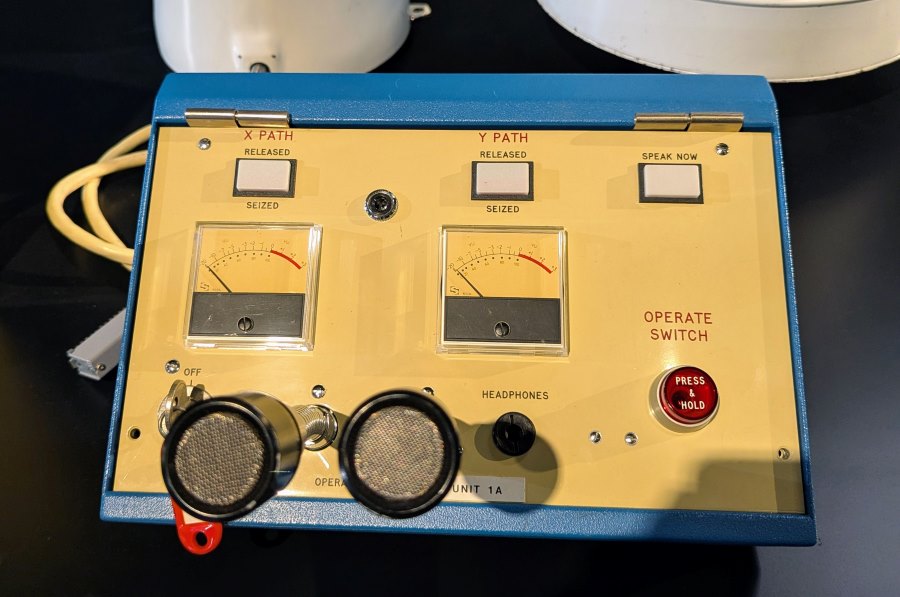
And when it came to ‘Early Warning’ of a nuclear attack…
The signage for this artefact says: “In 1957 the British government set up a warning and monitoring network to protect Britain in the event of nuclear war. From its headquarters, it would have issued the first warning of an attack through this ‘Handel’ Telecom Operating Unit 1A. The unit would have ordered 250 regional control points to sound the alert by cutting into British Telecom’s ‘speaking clock’, a facility that broadcasts accurate time 24 hours a day.” (© IWM)
But that’s not why I photographed it! Those two meters were manufactured by my father about the time I was born. #JustSaying
The Holocaust Galleries – Level 2
This is a major part of the IWM’s collection, but, for very understandable reasons, there is a strict No Photography rule, and I won’t write about things I can’t display.
All I can do is encourage you to visit for yourself. It’s a large collection with the emphasis on individuals and families caught up in the holocaust, seen through their personal effects, photographs, drawing, diaries, and letters. It is sensitively presented and the detail is haunting.
Blavatnik Art, Film and Photography Galleries & Special Exhibitions – Level 3
I’m also not going to write about Level 3. When I visited, one side of the ‘Terrace Galleries’ was closed and the other side had a special art exhibition ‘Beauty and Destruction – Wartime London in Art’. To be honest, I’m not so interested in art and after many hours in the museum it was nearing closing time, so I skipped both the Blavatnik and Beauty & Destruction galleries. I may revisit them another time when I’m in the area.
Declaration: None needed. The museum is free to visit.
* It was so infamous a cocktail was named after it. The French ’75’
Ingredients:
- Gin (or Cognac): 30 ml (1 oz)
- Fresh Lemon Juice: 15 ml (½ oz)
- Simple Syrup: 15 ml (½ oz)
- Champagne (or dry sparkling wine): 90 ml (3 oz)
Add the gin, lemon juice, and simple syrup to a shaker with ice and shake well until chilled. Strain the mixture into a champagne flute or coupe glass. Top with chilled champagne and garnish with a lemon twist.
Some historical records have the Gin swapped with Cognac for a richer flavour.
** You can see his full set of Lawrence of Arabia’s robes and dagger at the National Army Museum in Chelsea.
Factbox
Website:
The Imperial War Museum website is the ‘front door’ for all 5 IWM museums. Then choose IWM London.
Getting there:
IWM
Lambeth Road
London
SE1 6HZ
The easiest way to get there is via mainline rail or Northern | Jubilee | Bakerloo tube lines to Waterloo. Then change, if necessary, to the Bakerloo line to Lambeth North (1 stop). From there it’s a 10 min walk. The nearest bus stops are…
Lambeth Road: 344 and 360 bus routes
Kennington Road: 3, 59 and 159 bus routes
Entry Price:
FREE, but you are encouraged to leave a donation.
You are also encouraged to become a member, which makes very good sense if you are likely to be visiting any of the other IWM museums, because membership gives you free entry to the IWM’s priced sites (HMS Belfast, IWM Duxford, Churchill War Rooms) discounts on event tickets like airshows, priority booking, etc. Prices from £5 a month for a single adult.
Opening Hours:
10:00 – 18:00 every day except 24 to 26 December